
by Sarang Nagmote
Category - Cloud Computing
More Information & Updates Available at: http://http://vibranttechnologies.co.in
This blog post describes the best way to host a private Docker Registry instance on Amazon EC2 and Amazon S3. You can skip the text and go to the ‘Resources’ section to get the ECS Task Definition JSON.
When working with microservices nowadays, you can hardly avoid using Docker. After building your first Docker container, your next step would be to share it with the world (or your colleagues). To achieve it you have three alternatives:
- Use a Docker Hub or any other SaaS registry.
- Deploy your own instance of open-source Docker Registry project (now called ‘Distribution’).
- Buy an enterprise version of the Docker registry, which is based on open-source Docker registry project with some add-ons from Docker Inc.
For a small project, the Docker Hub ‘way’ is the best alternative: You can host one ‘private’ image for free, whereas commercial pricing plans will allow you to upload more. For more serious projects, we would like to retain control of our most precious asset—our code, so we want to run our own private instance of Docker Registry on Amazon EC2.
After a little bit of Googling, we found a great article from Codeship guys (disclaimer: we are longtime and happy users of Codeship CI). This blog post describes the process very well and up to the smallest details, however, some of the aspects of ‘production’ deployment like Authentication and Encryption (aka HTTPS) are not described, and that’s what we want to describe in this blog post.
Our goal is to give you a ready-to-use recipe for deploying your private instance of Docker Registry that is running on top of Amazon Elastic Container Service (which runs on top of EC2) and uses Amazon S3 as storage.
Enable Amazon S3 and Authentication in Registry Config
Note: You don’t actually need to do this, just use a ready-made elasticio/docker-registry-ecs, no worries you can set all custom configuration properties (e.g. S3 access credentials) via environment variables later.
We will use an Amazon Container Service to run the trusted open-source Docker container from Docker Inc. Docker Registry is distributed as a Docker container that is named
registry:2.
However, we need to enable some of the features of the Docker Registry, e.g. S3 as storage and authentication, so we need to customize the configuration—instead of default values, we need to place our changed config.yml in the image with the following content:
version: 0.1log: fields: service: registryauth: htpasswd: realm: basic-realm path: /auth/htpasswdhttp: addr: :5000 headers: X-Content-Type-Options: [nosniff]storage: cache: layerinfo: inmemory s3: accesskey: secretkey: region: set-via-env-vars bucket: set-via-env-vars encrypt: true secure: true v4auth: true chunksize: 5242880 rootdirectory: /
The simplest way to place configuration in the Docker image is to build a new image with new configuration based on the original image. You can achieve it with the following two lines in the
Dockerfile:FROM registry:2COPY config.yml /etc/docker/registry/config.yml
The best part is actually that you don’t have to do it as we prepared a ready-made image you can use with exactly the same content described above. You can find this image under
elasticio/docker-registry-ecs name on GitHub.
Note that we don’t have to enable HTTPS on the Docker image itself—we’ll use an HTTPS termination feature on Amazon ELB and save us in-container certificate deployment step.
Create a Task Definition in ECS
We’ll run registry Docker image on Amazon Elastic Container Service (that runs on top of EC2). ECS runs applications (called Tasks) inside the set of EC2 instances called Cluster. So, the first step you need to do is to create a new cluster on ECS. It’s easy to do via Amazon Console, just launch a sample cluster called ‘default’.
After your cluster is up and running, you need to upload a Task definition. Task definition is a JSON that defines which Docker image to run, what resources it needs, and its environment variables and their values. Here you can see the tasks definition with one task:
{ "containerDefinitions": [ { "volumesFrom": [], "portMappings": [ { "hostPort": 5000, "containerPort": 5000, "protocol": "tcp" } ], "command": [ "/etc/docker/registry/config.yml" ], "environment": [ { "name": "REGISTRY_AUTH_HTPASSWD_REALM", "value": "elastic.io private registry" }, { "name": "REGISTRY_STORAGE_S3_ACCESSKEY", "value": "PLACE-YOUR-S3-ACCESSKEY-HERE" }, { "name": "REGISTRY_STORAGE_S3_SECRETKEY", "value": "PLACE-YOUR-S3-SECRET-HERE" }, { "name": "REGISTRY_STORAGE_S3_REGION", "value": "PLACE-YOUR-S3-BUCKET-REGION-HERE" }, { "name": "REGISTRY_STORAGE_S3_BUCKET", "value": "PLACE-YOUR-S3-BUCKET-NAME-HERE" }, { "name": "REGISTRY_AUTH_HTPASSWD_PATH", "value": "/auth/htpasswd" } ], "essential": true, "entryPoint": [], "links": [], "mountPoints": [ { "containerPath": "/auth", "sourceVolume": "auth", "readOnly": true } ], "memory": 1000, "name": "registry", "cpu": 1024, "image": "elasticio/docker-registry-ecs:latest" } ], "volumes": [ { "host": { "sourcePath": "/home/ec2-user/auth" }, "name": "auth" } ], "family": "registry"}
In your AWS ECS Console, go to Task Definitions, then click on Create new Task Definition, and paste the JSON above to the JSON tab.
As you can see, here you need to set the following environment variables:
- S3 Bucket name and region – this S3 bucket will be used by Registry to store. Set via
REGISTRY_STORAGE_S3_BUCKETandREGISTRY_STORAGE_S3_REGION. Note registry support V4 authentication so it also works with S3 in Frankfurt (data security rocks!). - S3 Authentication credentials – we recommend creating a new user with restricted S3 permissions to the registry’s bucket. Set via
REGISTRY_STORAGE_S3_ACCESSKEYandREGISTRY_STORAGE_S3_SECRETKEY. - Authentication realm name – set via
REGISTRY_AUTH_HTPASSWD_REALM
Create an HTPASSWD File
As the next step, we need to configure users/passwords for HTTP Authentication that will be used for the registry. Unfortunately, we haven’t yet found the way to deploy it via environment variables, therefore, it’s done via filesystem mount.
You would need to add SSH into your cluster’s node and create a new HTPASSWD.
ssh -i ~/.ssh/your-key.pem ec2-user@your-cluster-node
Then you need to create a folder auth and create an HTPASSWD file inside it:
mkdir -p authcd authdocker run --entrypoint htpasswd registry:2 -Bbn testuser testpassword >> htpasswd
Last but not least, generate a username/password line and append it to
.htpasswd file.Launch Your Service
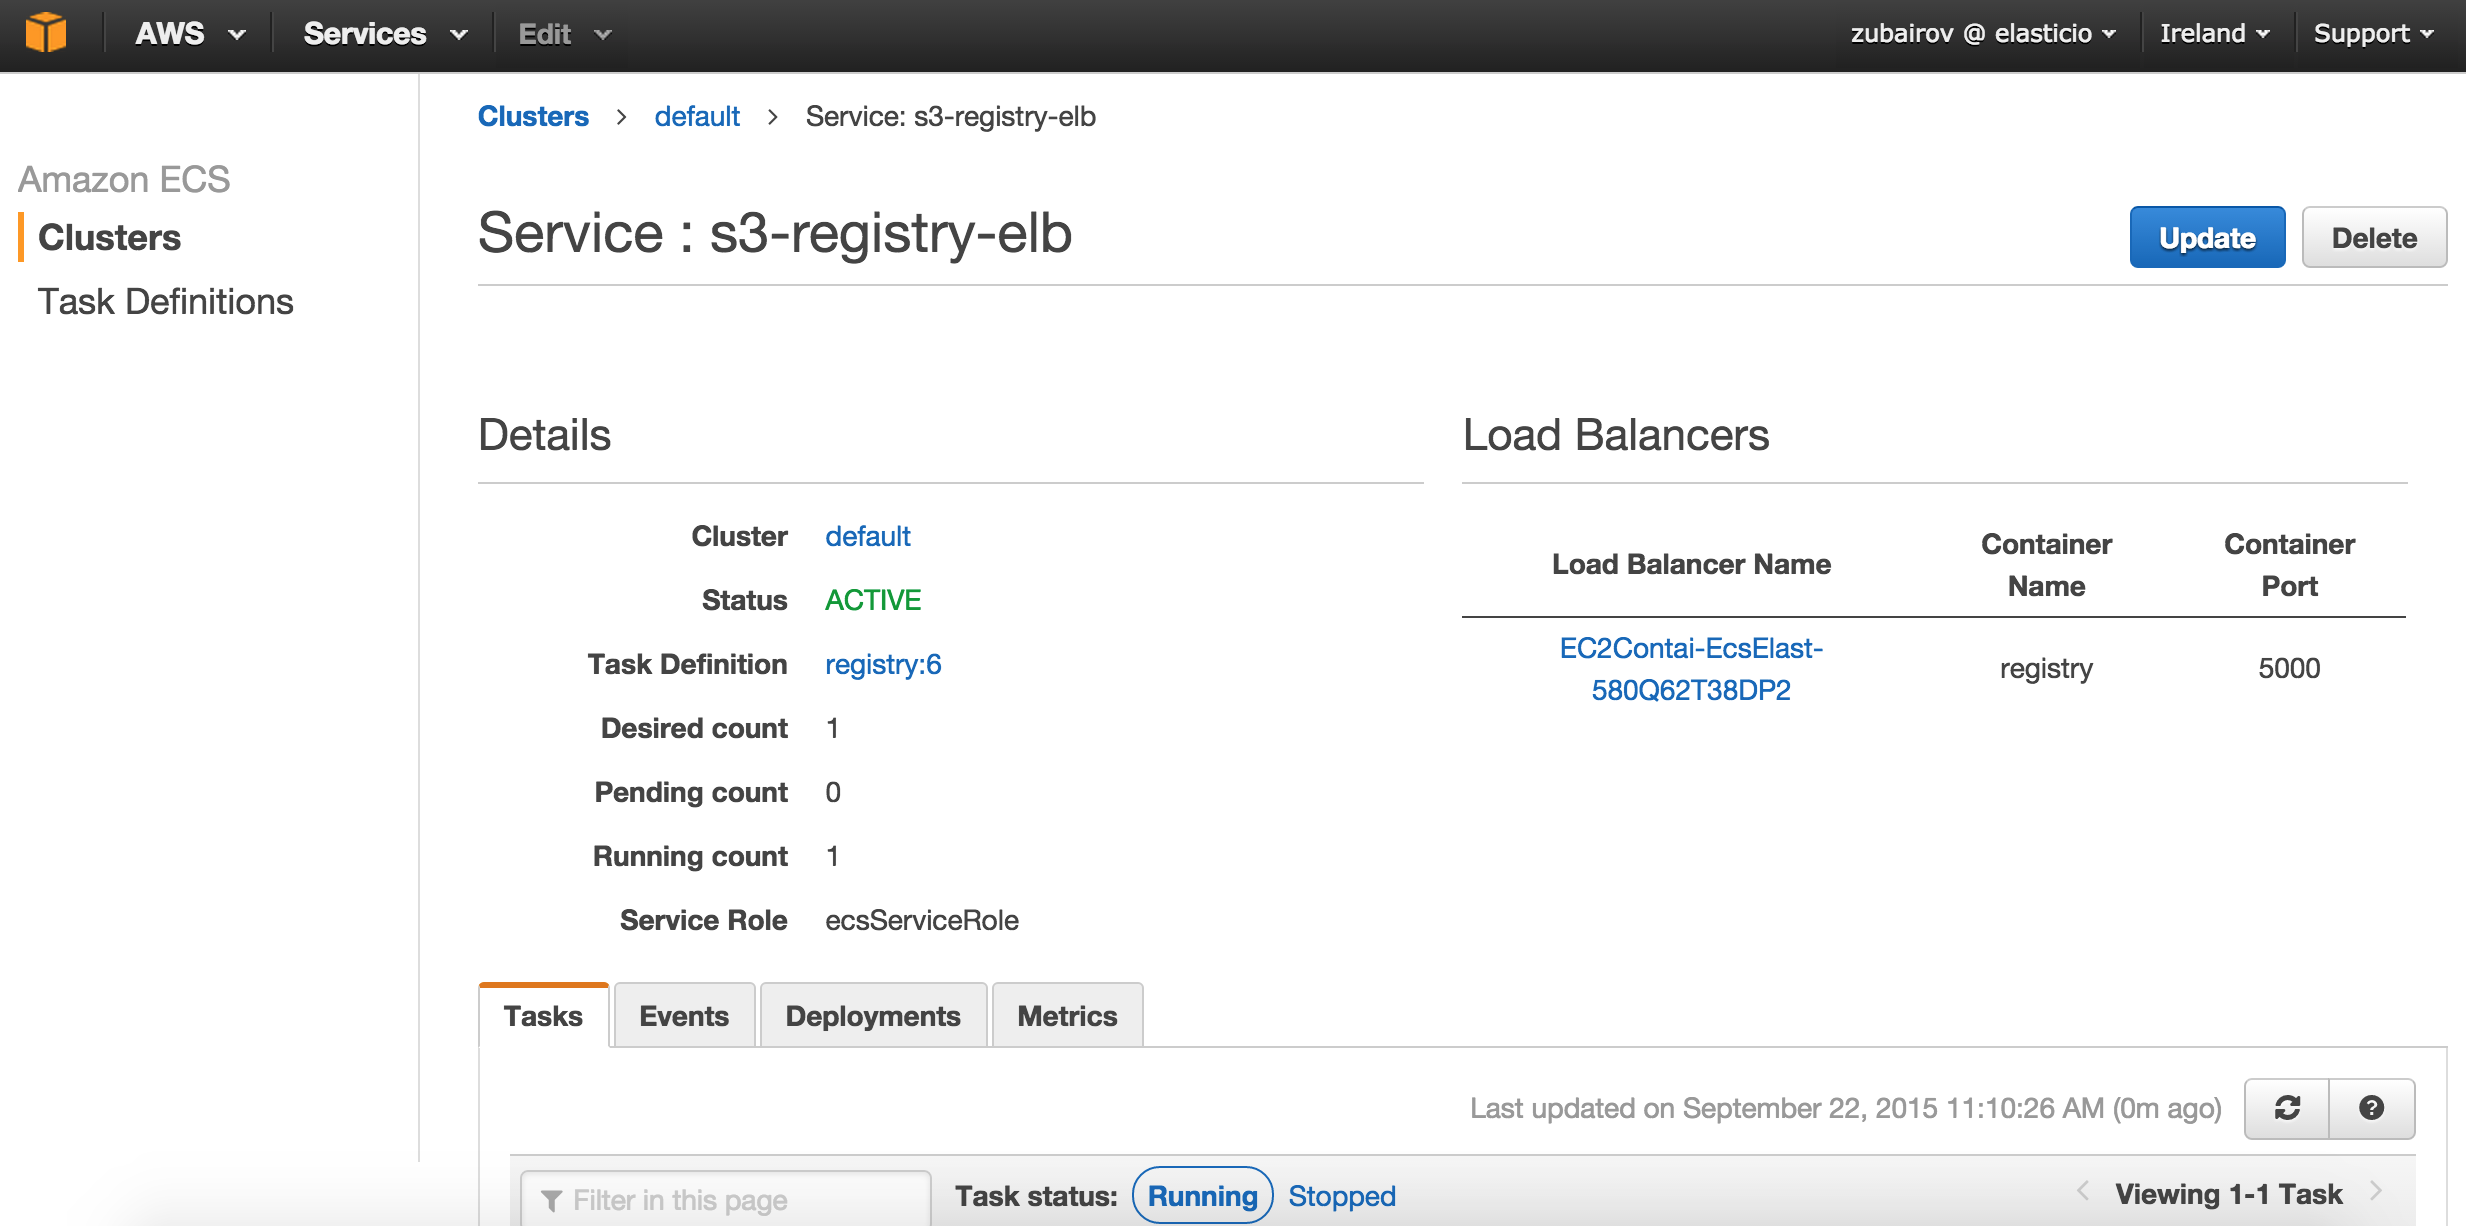
Next, you would need to create a ‘Service’ from your ECS Task, just click on the Clusters, select your cluster and click on the Create new Service. Then select a task description and specify the number of instances of your task.
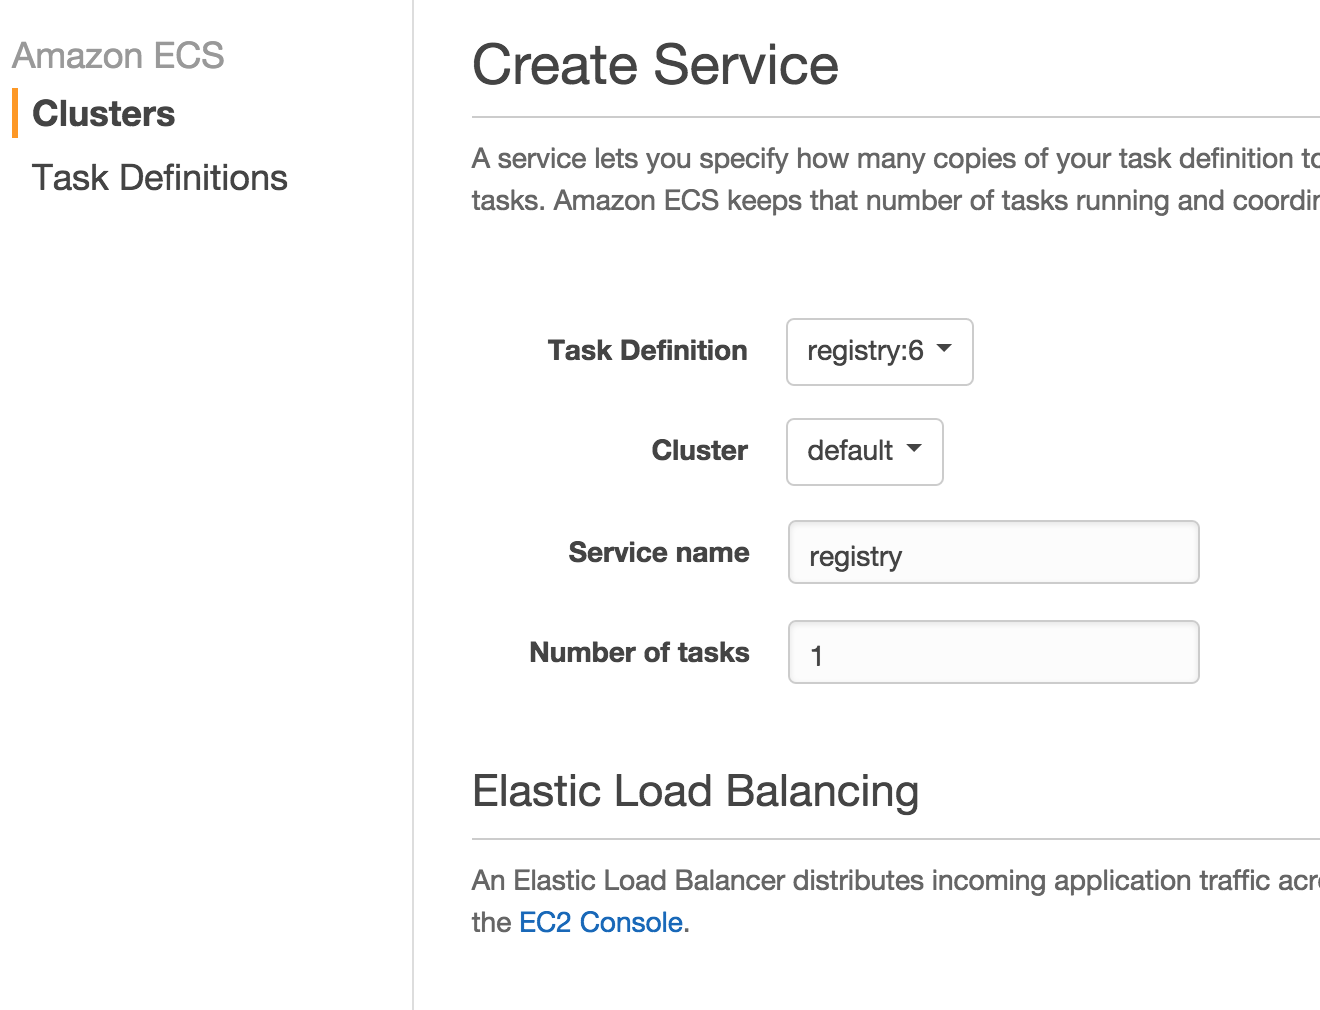
Then launch the service and wait a minute or two until it fully starts:
Configure HTTPS on Load Balancer
So, now we have a Docker registry running on Amazon ECS with HTTP Basic authentication to protect your know-how, the only missing piece is encryption—enabling HTTPS. One possible way to achieve this is to enable HTTPS inside the Docker Registry image as described here. We, however, will use HTTPS Termination feature of the AWS Elastic Load Balancer.
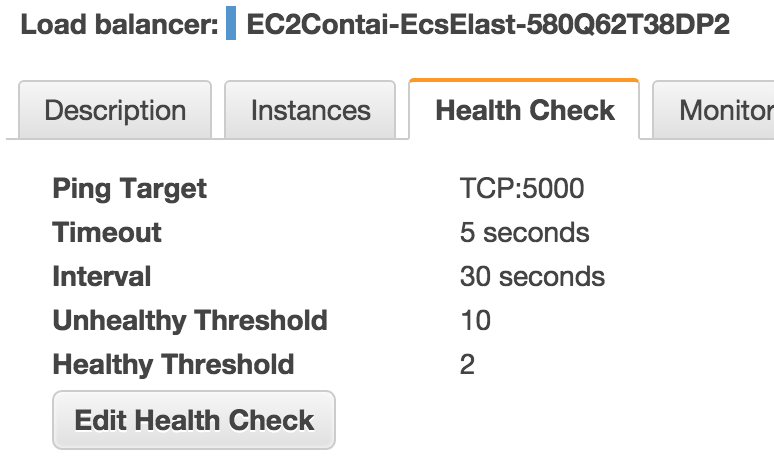
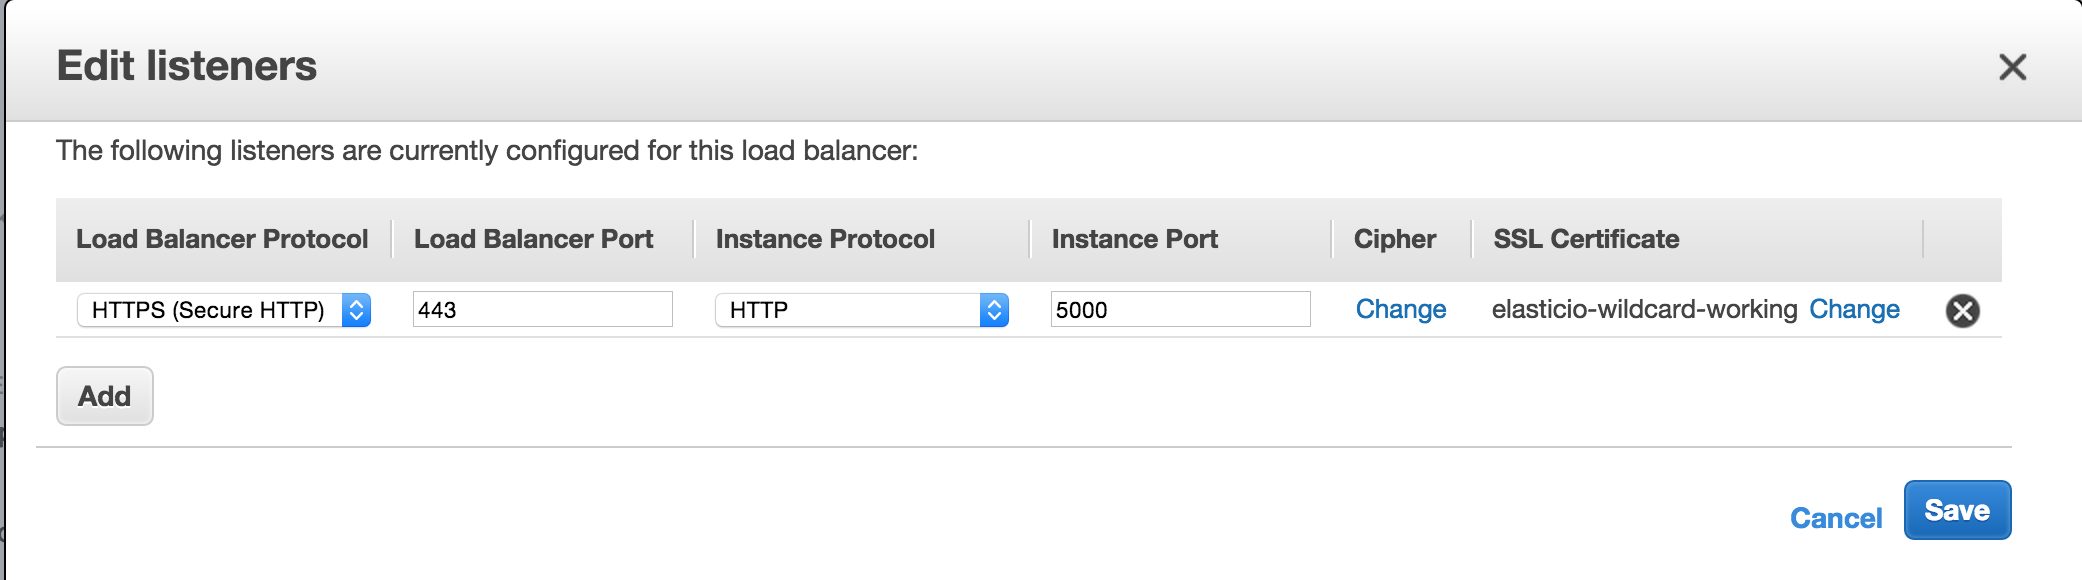
Go to the EC2 console (from ECS console) and find a load balancer that was created together with your ECS cluster. Now you need to do two things:
1. Change the listener’s health checking settings to TCP:5000—this is important so that LB knows when your registry instance is up and running. Originally configuration to HTTP:5000/ won’t work as ELB expect HTTP 200 while it will be getting HTTP 404 from registry instead.
2. Change listeners configuration: You need a single listener that listens on HTTPS:443 and forwards requests to HTTP:5000 of the instance. Here you can deploy your HTTPS certificate.
So, now you should be all set, your private Docker registry will run on EC2 instance and store data to S3. Your registry will be protected by HTTP Basic Auth which is in combination with HTTPS (terminated on ELB within your AWS VPC) is a good way to protect your Docker images.
Test Your Setup
We gave our registry the name
registry.elastic.io, which is a CNAME alias to ELB DNS name. Now take the CURL and try to query your newly deployed Docker registry.curl -i https://registry.elastic.io/v2/
And, you should see something like this:
HTTP/1.1 401 UnauthorizedContent-Type: application/json; charset=utf-8Date: Tue, 22 Sep 2015 15:00:39 GMTDocker-Distribution-Api-Version: registry/2.0Www-Authenticate: Basic realm="elastic.io private registry"Content-Length: 114Connection: keep-alive{"errors":[{"code":"UNAUTHORIZED","message":"access to the requested resource is not authorized","detail":null}]}
Now let’s try basic authorization:
curl -i https://testuser:testpassword@registry.elastic.io/v2/
And, you should see:
HTTP/1.1 200 OKContent-Type: application/json; charset=utf-8Date: Tue, 22 Sep 2015 15:21:53 GMTDocker-Distribution-Api-Version: registry/2.0Content-Length: 2Connection: keep-alive{}~
Now you can try to log in with your Docker to your new registry:
{}~ docker login registry.elastic.ioSummary & Resources
Let me summarize what we did:
-
We created a Docker registry image with customized
config.ymlthat could be found here -
We created a new Amazon ECS cluster
-
We deployed a task description JSON with a configured Docker registry image. Task definition could be found here
-
In the JSON file, we placed S3 credentials and S3 bucket name + region where Docker Registry will store artefacts
-
We configured authentication settings file on the cluster node(s)
-
We started cluster and updated the Load Balancer configuration to terminate HTTPS
That’s it—now you have a running private docker registry on your infrastructure hosted on Amazon Web Services.
TODOs
The setup described above is not ideal, because due to the lack of time, the following actions are skipped (feedback and change suggestions are welcome):
- One could assign an AWS Role with associated S3 Write permission for S3 bucket. In that case, we wouldnt need to specify S3 credentials in the Task definition
- Authentication could be made configurable via environment variables instead of complicated volume mounting
- Cluster-specific configuration and auto-scale group for transparently scaling registry
- Caching into Redis or AWS-proprietary alternative
No comments:
Post a Comment